Time to sell REALLY sell the Van.
After almost 3 years of semi-full-time VanLife, it’s time to retire “Candy” my van. For those who follow on Facebook and/or Instagram, you know VanLife has been a LOT of Ups and Downs. Sadly for me, I think it’s been more Down’s than I need right now. I think a combination of Loneliness, compounded with the extra hardships of Covid lockdowns, plus working more-than-full-time has been VERY hard. I’ve had some AMAZING experiences with the bad, and I’m super grateful for that. Now it’s time for someone else to have some adventures.
Lets get the the Van Details
- 2015 Ram Promaster 2500
- 159″ Wheelbase
- Front Wheel Drive
- 231,000-ish Miles
- Purchased with 192,000
- Originally a lightweight Transport, so almost all of the mileage is highway
- V6 Gas, not Diesel
- I chose this so that it would be easier in Mexico
- Has only seen snow
45 times… but never more than a day or two - Before purchased it was in a side-impact accident
- All repaired, and NOT a salvage
- Has been OVER-welded to be extra safe
- BRAND NEW: Transmission, Radiator, Oil Filter Housing, Struts, Brakes, Rotors, Pads, Headlights
- [In-Shop]: Transmission (Warranty), Steering Rack
- TONS of storage!!!
- FULL Roof Deck
- 200W of Solar
- 280AH @24V LifePo4 DIY batteries (560AH@12v)
- 3000W “All-in-One” Growatt Pure Sine Inverter
- 25 Gallon Fresh Water tank
- 7 Gallon removable gray water tank
- Dual Maxxair Deluxe fans
- Winegard Wifi/4G
- 30A Shore power port
- T-vent windows on Driver and Passenger sides
- Brand new tires


Asking $40,000
Selling in Austin TX
Might be in Atlanta or San Diego next if no buyers
Back-story, skip if you just want the “good stuff”
I’ve hit a couple of my “bucket list” items, like:
- Seeing – and hugging – the Redwood’s and Sequoia’s
- I visited Steve Prefontaine’s hometown and college
- Sleeping on the cliffs next to the ocean (let me tell you that is VERY VERY VERY Windy!!!)
- Spent a little over a week at my favorite camp – Owasippe – with the whole place to myself
- I’ve seen the Goonies locations
- I’ve visited Puerto Rico, and finally eaten Mofongo
And also some things I didn’t know where on my list:
- TWO [half-hearted] attempted break-in’s
- Stuck on a mountain in a complete whiteout storm… only a day
- Stuck in Texas with a snow storm… in TEXAS!!!
- Stuck on a beach for 5 hrs, to pay $550 to get towed
- Attacked by Racoon’s who fought to rip open my fans and get in
- and learning that Louisiana Hot Sauce will keep them at bay
- MANY MANY sunburns
- Too much Sand… EVERYWHERE
- And quite a bit of expense on repairs/upgrades
And some generally good experiences:
- Learned a LOT about 12/24V systems in rebuilding my electrical system 3 times (actually more, but smaller iterations)
- Including building my own bank of lithium batteries at a HUGE expense when I dropped said batteries and ruined a set
- Making some new friends, and expanding my experiences/comfort zone
- I lost weight, and started feeling great for a while…
- Sadly this last month and half in a hotel has done some SERIOUS damage to that gain
- So many photos taken (about 1.2 TB), that I can’t even view them all to sort through
- But I hope to soon, and make a travel book, by request of my Mom
Projects remaining…
Now this van has been a constant work-in-progress. Many things that I thought I absolutely needed are totally luxury now. Many many tweaks and updates along the way. I tried to build everything in a way that makes nothing TRUELY permanent. Proven by the fact that we rebuilt the walls 3 times, and kitchen at least 3 as well. Actually, the ONLY thing that hasn’t been rebuilt at least 2 times is the Bed. This bed can survive a bomb dropped on the van. I started with knowing NOTHING about building, and have SOOO much pride in what I’ve accomplished.
That said, there are still some things that are on the “to-do” list, that I’ll now transfer to the next owner. Some of them intentionally not done so that there was room for personalization and the pride that comes with that.
This is a GREAT starting point van if you aren’t confident on many parts of the build, and just want to do some design tweaks primarily.
Diesel Heater (Must complete, or remove)
- Partly-mounted under seat, currently not functional (troubleshooting with techs, but honestly its $150 to replace, I just don’t care since I’m south now).
- I even have additional piping and mounting I purchased knowing I’d mess up
- Perfect to run further away, or around other elements
Interior
- Paint / Decorate (Optional)
- I’ve been happy with the wood look, and also could never decide on colors
- Just needs a light sanding (just because thats best practice), and then Paint
- Window Covers (Optional)
- Totally works, just not as pretty
- I have extra quilt material that I planned on putting INSIDE the curtains to make it warmer
- Cab Divider (Optional)
- I currently have some blackout house curtains, held by magnets, but maybe could be prettier
- Shower (Optional)
- I have this framed out, but am using it as bathroom/closet
- You will need to make a custom shower pan as the main rib on the side with extra welding protrudes (closed off). I have a standard one now, and it sticks out a bit, and its more just to ensure I never have a toilet leak, but I HAVE showered in in with my outdoor water bag a couple times.
- Totally optional because Gym showers are MUCH nicer
- Technically the sink faucet could be put inside, and outside the side door as well
What’s inside?
I want to be fully transparent on everything that went into it, and what extras come with. All mechanical work has receipts. Self-installed work was all done by my buddy who is a certified master mechanic. Just about everything in the below inventory is either from Amazon (which I can provide links for some items (ain’t nobody got time for ALL), dealer, or Home Depot and AutoZone. And for some reason I’ve also kept 98% of all gas receipts :shrug:
Mechanical Work – $15,970
Mac Haik Georgetown, Dodge Dealer – Feb 2022
- Currently in the shop to have Transmission repaired, but its a long wait for parts
- This is 100% under warranty
- I was intending to also service the steering rack
Kearny Mesa Dodge Dealer – Feb 2021
- New
Transmission– $8K - New
Radiator– $2K - New
StrutsandBall Joints– $2K - New
Oil Filter Housing– $1K - Misc
rusted pipesreplaced - ALL under warranty
Brakes Plus, El Paso Tx – Feb 2021
- New front
Rotors,Calipers, andPads– $950 - ALL under warranty
Moorish Roadside Rescue, Phoenix Az – Feb 2021
Rear Passenger tirereplaced- Matched the closest tire from used tire dealer since we couldn’t get the spare in the dark
Matt Bower Chrysler, Baton Rogue, LA – Feb 2022
- Full set of new all-weather tires – $1,100
- Balance
- Alignment
Self Installed
Additional structural welding– April 2019- Van was originally in an accident to the mid driver-side
- They Welded, but we wanted to be safer, and went with DOUBLE
Rotors(4x),Pads(4x), andCalipers(Front) – April 2019New rear bumper– May 2020 – $100- Rear ended by someone
- VERY minor warp to the bumper, but it caused the plastic case to not fit properly
- New bumper is 2X stronger than original
Headlights– $290- Clearance Lights – $30
Build Components – $10,119
External/Mechanical: $3,642
T-vent Windows, both sides – $2k- 2x
Maxxair Fans– $660 - 2x 100W Solar Panels – $200
- AA-Racks AX312-PR Roof Rails – $360
- Winegard Connect 2.0 4G/Wifi – $300
- Telescoping Ladder 12.5ft – $82
- Kobra OBD2 – $40
- Swivel Seat –
??? - Diesel Heater –
???
Electrical: $3,785 + $976 = $4,761
- 8x 280AH LifePo4 DIY Batteries – $2,500
- Daly 24v 8S BMS – $200
- 30ft Solar Extension Cable – $35
- 15A-to-30A Adapter – $20
- 25′ 30A RV Power Cable – $40
- Growatt 3000W 24v all-in-one – $820
- Growatt Wifi Module – $80
- DC/DC 24-to-12V – $37
- 3x 50A Inline Breaker – $13
- 2x 4-way Power Distribution block – $13
- Series Branch Solar Connector – $13
- DC Multifunction Battery Monitor Shunt – $20
- 10A NOCO Genius Charger – $100
- 2x 12 Terminal Distribution Block – $30
- 5 Terminal Bus Bar – $15
- 2x 12v Dimmable Switch – $60
- 2x RV Gooseneck Lamp – $50
- Cllena Dual USB 4.2A 12V Outlet and Switch Panel – $45
- 8x Puck Lights – $65
- Solar ABS Entry Gland – $12
- Leisure RV 30A Inlet – $18
- Victron Orion-Tr Smart 12/24V 15A DC-DC Charger, Isolated (Bluetooth) – $265
Plumbing: $298
- Sediment Filter – $13
- Fresh Water Pump – $20
- Fresh Water Tubing – $10
- Fresh Water Tank (25G) – $95
- Gray Water Tank 7G- $15
- Sink – $??? (Home Depot)
- Pipes – $??? (Home Depot)
- Thetford Cassette Toilet – $145
- You can have this if you WANT, but I’d most definitely suggest getting your own
Appliances: $637
- Apicool Dual-zone Fridge – $370
- Camp Chef Oven – $205
Misc: $1,131
- AKASO DL12 2.5K Mirror Dash + Rear View – $110
- Floating Shelves – $28
- Folding Grill – $21
- Space Heater/Fan – $54
- 2x Magnetic Screen – $80
- Zinus 6 inch “Green Tea” Memory Foam Mattress – $185
- Prime Design AAL Rear Van Door Hook Access Ladder – $650
Building Materials: $1,693
- Reflectix Roll – $45
- 2x Vent Covers – $28
- 20″ Slider Mounts – $40
- 3x 36 sqft 80mil Kilmat – $180
- Wood/Flooring/Hardware – @ $1,400
Photos
Since this is Covid days, and I also work a LOT, I can’t give a million tours. I’ve tried to take photos of a LOT of details. Different angles of things. I’m not in any way trying to hide anything. I’ve lived in this van for almost 3 yrs. There are scuffs and dings. If there are specific things you’d like to see let me know. I’ll try to accommodate within reason. But I won’t be disassembling anything. I’m also REALLY busy with crazy work hours.
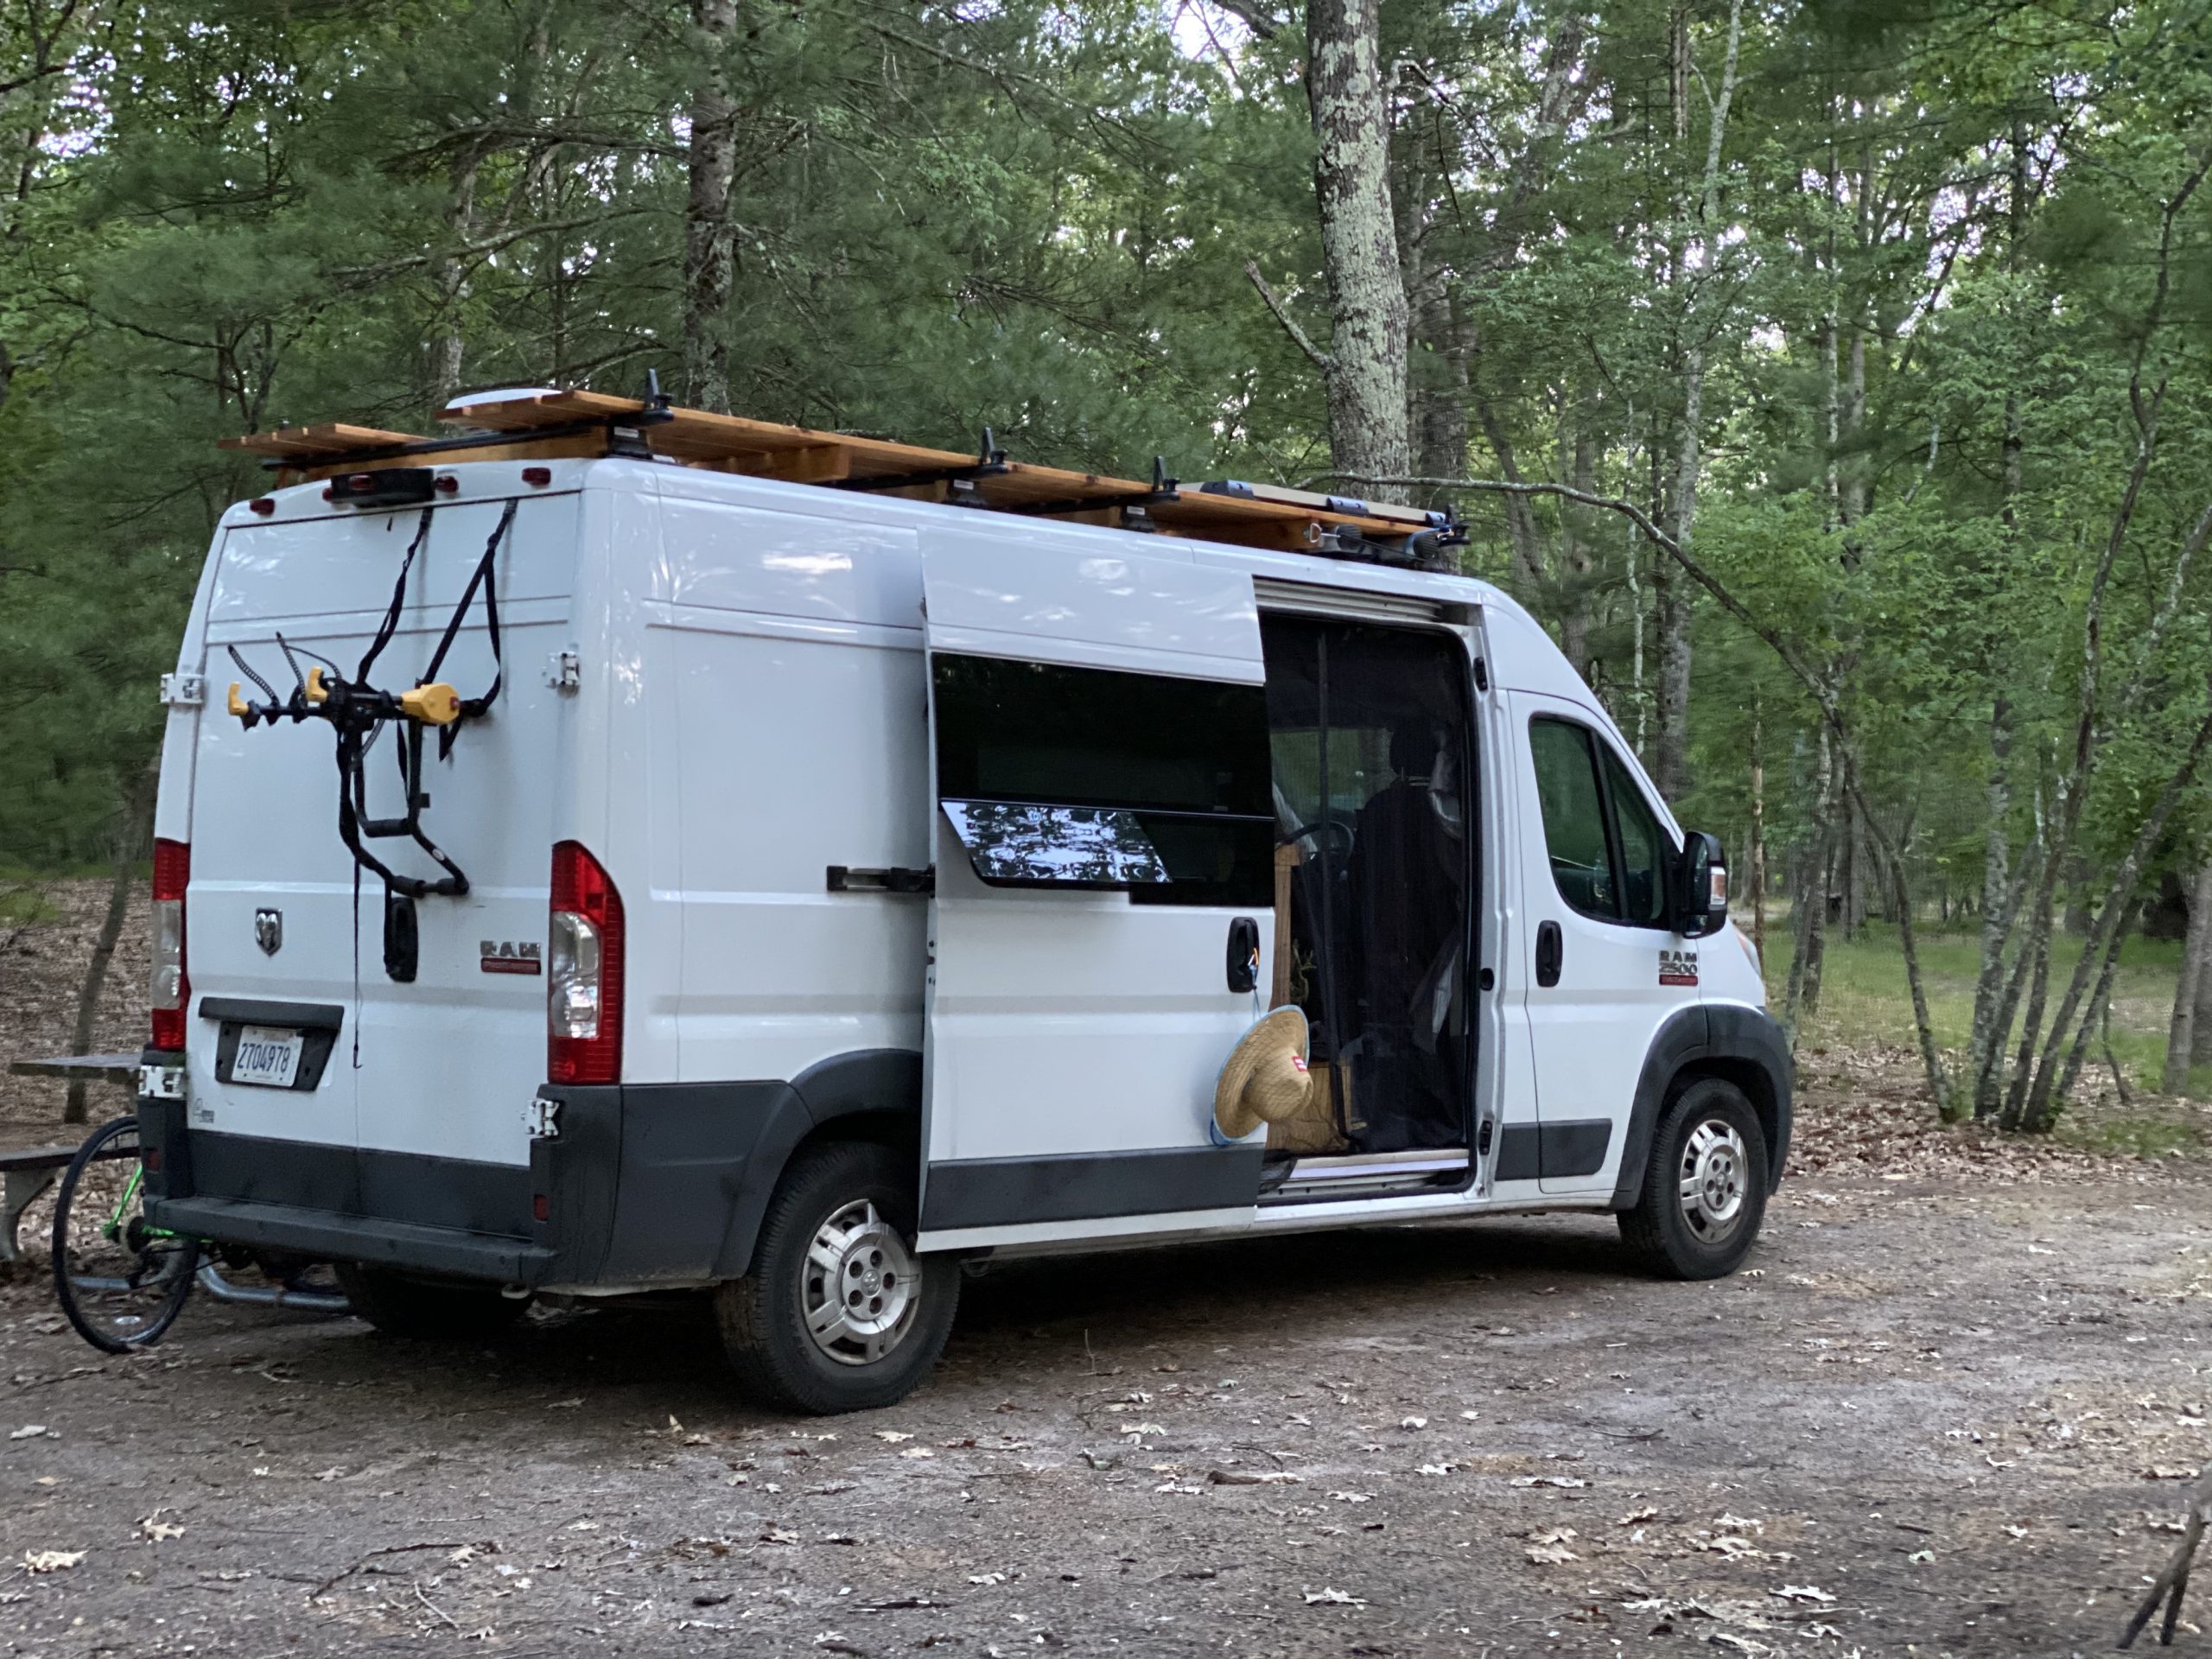
The Exterior
There are the usual road digs, and dirt, and scuffs. Many will come off with a nice pressure washer, or a bit of acetone. The bike carrier (gone now) lefts some marks unfortunately. The little plastic side bumpers have a couple parts where they are loose. A dab of silicone (i’ll include in the storage) will fix it up… maybe I’ll even do it before selling, depending on time.
Full-roof deck is VERY sturdy, and can support over 500 lbs. Built on top of roof rails rated at 500, I also ran some joists parallel to help lower flexing. It was originally stained, but it gets a LOT of sun beating down on it. Bolts are angle grinder cut down so it is mostly smooth on top. Rails have tie-down triangles, which I used to keep my inflatable raft down. Kayaks were the next plan.
I installed a Prime Design AAL Rear Van Door Hook Access Ladder… so no more telescoping ladder over the door. This is MUCH better, and is removable with no drilling damage.
T-vent windows on both sides of main area. And velcro-attached bug screens (LIFE SAVER).


The “Main” area (kitchen, bathroom, office)
Some of the biggest requirements for me were a solid area to work, an actually functional stove, and a bathroom. Specifically with the “office”, it HAD to have a great view from the side door. The office table is on a Lagun mount, and I actually have an extra mount for it since I wanted to put next to passenger seat. The table top was literally a scrap of wood I put temporarily, and never cared to change it since.
Galley unit has a solid 1.5″ butcher block, that I’ve treated with simple conditioner every couple months. The frame was rebuilt to be a bit more shallow and allow more walking space, after the first couple months. I purchased the stove even before the van, based on having rented a van prior and loving it. Propane runs from the back of the van, with a 10lb tank. I’ve cooked quite a lot, and only refilled ONCE. The regulator is carved into the butcher block underside, so there is no movement at all. Never once have I smelled a leak. I also have a bluetooth tank monitor. Sink has a simple pump. It’s loud. I think ALL of them are loud. Don’t turn it on if you are trying to be “stealthy” (there is NOTHING stealth about this van). It has it’s own switch so that it doesn’t keep trying to maintain pressure when not in use (basically it would do 1 pump every minute). The refrigerator is on a tray below, and has a 12v port behind (unused), and some storage on the side. There is a big storage area under the sink, while irregular shaped, is PLENTY for utensils, bottles of cleaner, candles, pots/pans, etc.
Bathroom was meant to be a wet bath, but honestly the gym shower is SOO much nicer. The cassette toilet is AMAZINGLY simple to maintain. I’ll leave mine, but you probably really want your own “fresh” one. I’d do it again in a heart beat, because you can empty the thing in RV dumps, or even in park/house toilets. No mess. LOTS of hanging space. And I also have a plastic drawer system you can have. I have a 27×24″ shower pan at the bottom to ensure no spills if I hit a gnarly bump, but have also taken a shower inside with it when it was too cold outside.
The bed is a normal Full size mattress. I believe a 6″ Zinus. WAY better than some futon mattress, or thin foam. I’m 5’5″ and have plenty of space to sit up. I’ve had a 6’2″ friend lay on it with a little bit of bending.
I covered the rear door with the same cedar planks. Heavy duty hooks on the both doors carry my camp chairs and shower tent, but could hold more if needed. There is some wood backer behind the cedar, where there is normally a gap in the metal. Older pictures below show only 1, but I finished the project.
Maxxair Deluxe fans over bed, and over office space, make for GREAT circulation even with the windows/doors closed. I leave them open ALL the time, even driving… you just can’t have the fans running while driving, or they get too much of a draft and shut down to protect.
I have a divider to block off the bathroom view from the front, using a simple tension rod and shower curtain. Cab divider is two blackout window curtains, held up by some magnets under the overhead storage, and along the side ribs. Can definitely be made prettier, but it blocks ALL light, and even most heat. Easy to take down and throw in the washer. Window curtains were always temporary. I put some marine buttons into both frames. They work great, but I almost always just use the magnets instead.
I’ve also since re-listing, upgraded to a larger 90L dual-zone fridge that comes with its own backup battery pack. It also has a pull handle and wheels, so you can take it out and on-the-go too. LOVE this thing!


The “Garage”
I put flooring down on my garage, because I covered the WHOLE floor, and then built on-top. Makes for much easier sliding things in and out. The side “shelves” were temporary, but still hold up, so never rebuilt. The tape was the FIRST way I held together for visual testing. As you can see, they are sturdy enough to hold a 25 gallon water tank that is full. Use the space under for odd-and-ends like tent, paddles, fishing gear, and hoses.
The water tank has a pressure relief valve, and a ball valves for the water intake hose that runs back. I think its 25ft. There is technically no drain, since I don’t really think I need to winterize being inside, and I could just pump it all out. Include a sediment filter and water filter that you attach to hose and then shore plumbing. This is NOT a pressurized system to run off of city water. You fill it up and unhook before using. Gray water tank, is just that simple gravity feed 7 gallon tank. I empty that weekly with the toilet, and have never been more than 3/4 full.
Enough space for 6+ 17 Gallon totes to store things, or perhaps you want to put bike tracks (my original plan). Added a lip for the rear, and a temporary one the stop things from sliding into the front. Can be used to add a sliding tray, or maybe a door to close it off more than just my curtain.
Its quite scary how much stuff you can start hoarding because of the ample space down here.


Updated:
- Finished the cedar lining on both sides… looks much nicer now
- Got rid of the shoe rack, just never used it
- Added HEAVY sound deadening curtains and mosquito net to back. Will likely take off the curtains just because its now warm out
- Propane has some more padding
Storage
I actually think that there is maybe TOO much storage now, because having so much space just enticed me to get more “stuff”. There is the huge garage, 3 large cabinets between kitchen and back of van, 2 large cabinets over the office, and a couple shelves i’ve added on the sides of things. Over the cab is a VERY spacious storage area too.
Cabinets are simple construction, but sturdy. Everything has a latch appropriate to the amount of pain i’ve endured over the first couple months of dealing with everything going flying on each turn. I put dividers in the larger 3-set cabinet. None of those are permanent, they are just simple scraps of wood on tiny angle brackets. Rearrange as fits your stuff.
The lip above the bed is part of the frame, and where they ran wires. We used it for that, as well as books and/or cell phones.
I also built a storage box behind the passenger seat so that I can put my feet up on when I swivel around. It is OVER engineered so that it also acts as a step-up into the van for people who aren’t used to going in-out all day like I am. Also works nice from the bench as an ottoman.


Updates:
- I’ve added more organizing totes
- Somehow managed to double the items I have now :😱:
- Plastic 3-drawer organizer added, and accessible from the front
Electrical
Ok, let’s start with, YES, it IS ugly… but it all works. It runs off Solar, with 200W panels on the roof. Shore power port (30A) is external, and will power 3 outlets (one above kitchen, and one in each corner in the back) will charge the batteries with 10A tender. I have the battery isolator to charge from alternator, and used it up until I switched to Lithium. I want to put a switch on it to kill it from the side of driver seat post, so that I don’t always use it and strain the alternator. You just have to add to positive terminal post if you want to use it again.
Everything lives under the office bench seat. It has gone through MANY iterations and updates. Currently I have a block of 280AH LifePo4 DIY batteries, 2p4s configuration, to make 560AH of 12v power. I have a switch panel on the side of the bench, which also has a 12v port and 2 usb ports. MT50 display is next to the window in a “pillar” I made out of cedar, because I had no clue how to box out the window. There is an additional shunt monitor on the battery, which just needs longer cables if you want to see it with/in-place-of the MT50. There is a 12 slot blade fuse distribution box, a 110v breaker box, and a solar charger box. Most of the other half of this bench is free for storage, and thats where I keep all the electrical and building hardware, plus toolbox. I’ll run through what switches are what, and what wires go where.
The 110v is currently wired directly to the 30A port outside, so they only work on shore power. I have included some power distribution posts that can be run from the inverter output, and then it will work on shore or battery. The Growatt unit makes this MUCH easier. I have the battery tender plugged into the kitchen outlet now, but you can move that to the distribution block if you install the hookup.
I put a 12v receptacle behind the fridge, but then hard-wired it because I thought it was too much draw from fridge. There is another above the bed, that was meant as temporary, but then I had no motivation to change it out. I also have two marine reading lamps that were to be mounted, but never ended up installing.
The plan was to switch to the All-in-one Growatt unit that I have in box, and simplify all the setup, and remove some bulk. It is a 3000W inverter, and I also purchased the wifi dongle so that you can check/control from anywhere (assuming you setup with the Winegard modem and keep that going). I have a separate 3000W inverter in place now, but because I use a 12v adapter for laptop, I honestly only use it for toaster and kettle. I leave it on all the time (unless I’ll be out of van for more than a day), and it only draws 1AH on idle.
UPDATES:
- This has been the area updated the most since originally planning to sell it
- I have indeed moved over the the 24v Growatt All-in-One unit
- I’ve cleaned up wiring a LOT compared to before… but its still not pretty.
- The batteries are configured in a “drop-in” bundle, to make taking out and any modifications easier
- I have all cells protected from shorts with Kapton tape
- Terminal posts were replaced with longer ones that have proper heads to cover them
- There is a wooden support platform, with “feet” to allow for air flow
- A layer of foam insulation, a heating pad with metal plate to distribute, and then the cells
- A wrap of foam around all
- and 2 sets of lead cables so you can swap out. One goes to BMS, and the other goes to a chain of extenders so you can plug in other components… currently a remote battery monitor with active balancing
- The 120v is now properly setup via the output of the Growatt unit, and a splitter to the various outlets. Breaker is built into the growatt, and I don’t run anything heavy duty, so you might want to add individual at some point if you feel needed
- BMS is bluetooth, so is the Victron DC/DC charger, and the Growatt has the optional wifi unit. So most things are managed without opening the bench.
- I am FINALLY able to say the battery setup is solid.


Maybe at some point I’ll do a video walk-through too. I made a couple attempts and it was terrible… but I was also emptying/cleaning it at the same time
Wow
It’s a bit surreal after looking up and writing all that. I hope to be as transparent as possible. Will give a walk-through of everything I’ve learned about the van, and anything I’ve built. I want to make sure the new owner is comfortable, and has some awesome adventures.
Happy to answer questions. Ignoring all crazy low-ballers and people who just want to complain. If you have an opinion, thats great, but I don’t care for it… it’s not the van for you.
If you are reading this, then you probably already know how to contact me, but it should be within whatever medium I posted the link to this in.